
KNIFE SHARPENING
Keeping knives sharp seems to be a frustration to many people--almost a mystical art--so let's make it easy and break it down into two areas: the basics of maintaining a good working edge, and a little bit about the "Art of Sharpening" (it's not so mystical). Sharpening your blade is a necessity if you want it to remain useful, but it can be an elusive thing to learn at first. You want your knife to perform at its best, but it can't if the edge isn't kept in shape. Many people are confused by all of the options out there for knife sharpening gadgets and methods, and although knife sharpening can be taken to an extreme, basic blade care is not difficult. You just need a little training and a few accessories.

Where to start?


The Basics


Look in the tool area of your local hardware store, or where knives are sold in most sporting goods stores. You'll find a whole wall of gadgets and things that claim to be the "best" or "easiest" or "only" tool you'll ever need to sharpen your knife. It's no wonder it's confusing!
For this discussion, we'll assume that your knife is in relatively good shape, it just doesn't have that wonderful edge that was on the knife when you bought it (the "factory edge"). Later on we'll get into fixing major problems with a knife's edge. A blade has a "primary bevel", which is the main bevel of the blade as it was ground into knife. When the knife is made, it is sharpened by putting a small "secondary bevel" at the edge of the blade that is steeper than the angle of the primary bevel:
When a blade is sharp, the secondary bevel meets at uniform angles to form a sharp edge. As the blade is used and the secondary bevel wears down, the knife becomes dull. Sharpening is the process of getting the secondary bevel back in place. Because there is still material (steel) in the primary bevel of the knife, it can be re-shaped into a new, sharper secondary bevel.
Depending on how much work is needed to re-shape the cutting (or secondary) edge, we select our sharpening tool. When I was a Boy Scout, we learned to sharpen our trusty pocketknives by working the blade against a sharpening stone. This would grind the sides of your shiny blade into a scratchy mess, and if you were lucky, it would also re-align your secondary edge to a somewhat better cutting state, though a bit rough. And you'd usually get cut in the process.
We had the right idea, but often just didn't get enough training to do it right. There are numerous flat sharpening devices like my old Scout stone that will do a good job of putting a uniform bevel back on your blade. They may be sharpening stones (which come in a multitude of grit strengths), diamond stones (a flat metal surface impregnated with diamond dust, or Arkansas stones (a natural fine-grained stone that is actually mined in Arkansas). These are some examples.
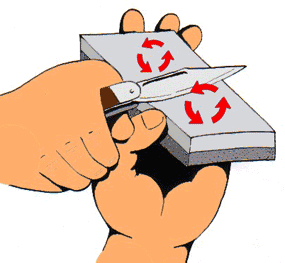
A stone is usually necessary when you need to do a fairly major re-beveling of your secondary edge. It's important to keep the blade at a consistent angle (about 20 degrees from the stone) on BOTH sides when cutting against the stone, and a lubricant like water or oil is usually present to keep things moving smoothly.
An alternate to the stone is a round sharpening rod. These can be made of ceramic, diamond-impregnated steel, or even just a striated length of tapered steel that is harder than your blade is (a typical "butcher's steel"). By "slicing" the blade downward against the rod at a uniform angle, you get the same effect as with the stone, but it covers a much smaller area of the blade at a time--unless you are moving downward AND to the side at the same time. There are fancy setups you can buy that put two upright rods at angles forming a "V", and even a guide to help you run your blade down each rod at a perfect angle, getting both sides of the blade re-aligned.
There are handy knife sharpening gadgets that can be easily carried in the pocket for quickly tuning-up your knife's edge when you don't have the time or tools to do a thorough job. These tools usually have "V" slots to draw the blade through, putting a uniform cutting edge on the blade. Some have a tapered ceramic or diamond rod for sharpening serrated knife edges (shudder). Don't get me started on serrated knives. These little tools have their place, but are no replacement for a good peaceful sharpening session with just you, your blades, a set of water stones and a strop, blues music playing in the background, and a Pepsi on the rocks. Okay, call me weird, but I love to sit and sharpen knives!
This is just an introduction to the myriad of devices for sharpening your knives. Remember, each knife is different, and may require different means to properly sharpen. The key is that you know HOW to put an edge back on your knife and get it working again. It's not scary, it just takes practice!


STONES
RODS


ALL-IN-ONE DEVICES


I can do
it, Ma!
Are We Done Yet?
Not quite, grasshopper. You may have learned some basics about putting an edge back on your knife, but to get that paper-shredding, arm-hair-shaving, SUPER EDGE on your blade, read on!
The techniques explained above tell you how to basically "grind" a new uniform edge on your blade, which for many people is enough. The knife is sharp, and certainly cuts better than before. But most sharpening processes leave microscopic "teeth" on the very edge of the blade, due to abrasion from the sharpening media. Stropping is a very old technique for removing the fine teeth and polishing your sharpened edge to truly hair-shaving capabilities!
Surely you have seen pictures of the classic old barber honing his straight razor on a long strap of leather, running the blade back and forth across the strap. This is called "stropping"
STROPPING

A strop is traditionally a piece of leather or canvas that is designed to re-align and polish the fine edge of a blade. With the flexible hanging strop like the one shown here, it can simply be a piece of heavy, smooth leather, and the blade is drawn with its edge facing backwards across the leather with firm, smooth strokes. This polishes the blade's edge and removes any "burrs" caused by the sharpening process. I remember times when I've been camping and sharpened my knife with my trusty pocket stone, then improvised a strop by hooking my belt to a tree and stropping my knife on the underside of the belt! You do what you have to in dire situations, even if your pants fall down.
The polishing quality of the leather can be improved by adding an abrasive compound to the surface of the leather. This can be a metal-polishing cream, or an abrasive similar to jeweler's rouge, where tiny particles of abrasive material are suspended in a type of wax. The rouge is rubbed into the leather, giving it a much better ability to polish the blade.
A strop can be a hanging piece of leather, or a piece of leather attached to a board, typically with a handle, making it a kind of stropping "paddle". The principle is the same in use: you apply an abrasive compound to the leather, and with the board either flat or held by its handle, the blade is drawn across the strop back and forth on both sides until the desired degree of sharpness is achieved.
I am now offering stropping boards that I make by hand in my line of knife products. My boards are made of red oak, and have two sides--one with the rougher "flesh" side of the leather facing up for more aggressive polishing, and the other side with the smooth finished side of the leather facing up for final polishing. The rough side is charged with a coarser polishing compound, and the finishing side with a finer compound to put the final mirror edge on your blade to make it ready to impress your friends by shaving all of the hair off your arms. Don't worry--it grows back.


Rough Side

Finish Side
Examples of polishing
compounds

A note on my stropping boards
Because there are so many abrasive compounds available, I don't sell those--just the boards. Take time to watch YouTube videos on "knife stropping" to understand what options and products are available to get for your stropping board. There are many options out there to choose from, so I don't want to dictate what kind of abrasive compounds you use.
But wait! I do initially prepare my boards for use by applying a "coarse" polishing compound to the rough side, and I lightly oil the smooth finishing side of the board so that you can use the board immediately as it comes. It is not necessary to apply a finishing abrasive to the smooth side of the board. It can be used by just keeping it lightly oiled with mineral oil like the barber strops of old. But you can apply a finishing abrasive, such as the green buffing rouge, to the smooth side of the board, even though it has been oiled. You will want to keep adding a coarser abrasive compound to the rough side of the board so that it maintains the ability to do the initial polishing of your blade. Feel free to email me if you have questions or want suggestions on where to buy polishing compounds.